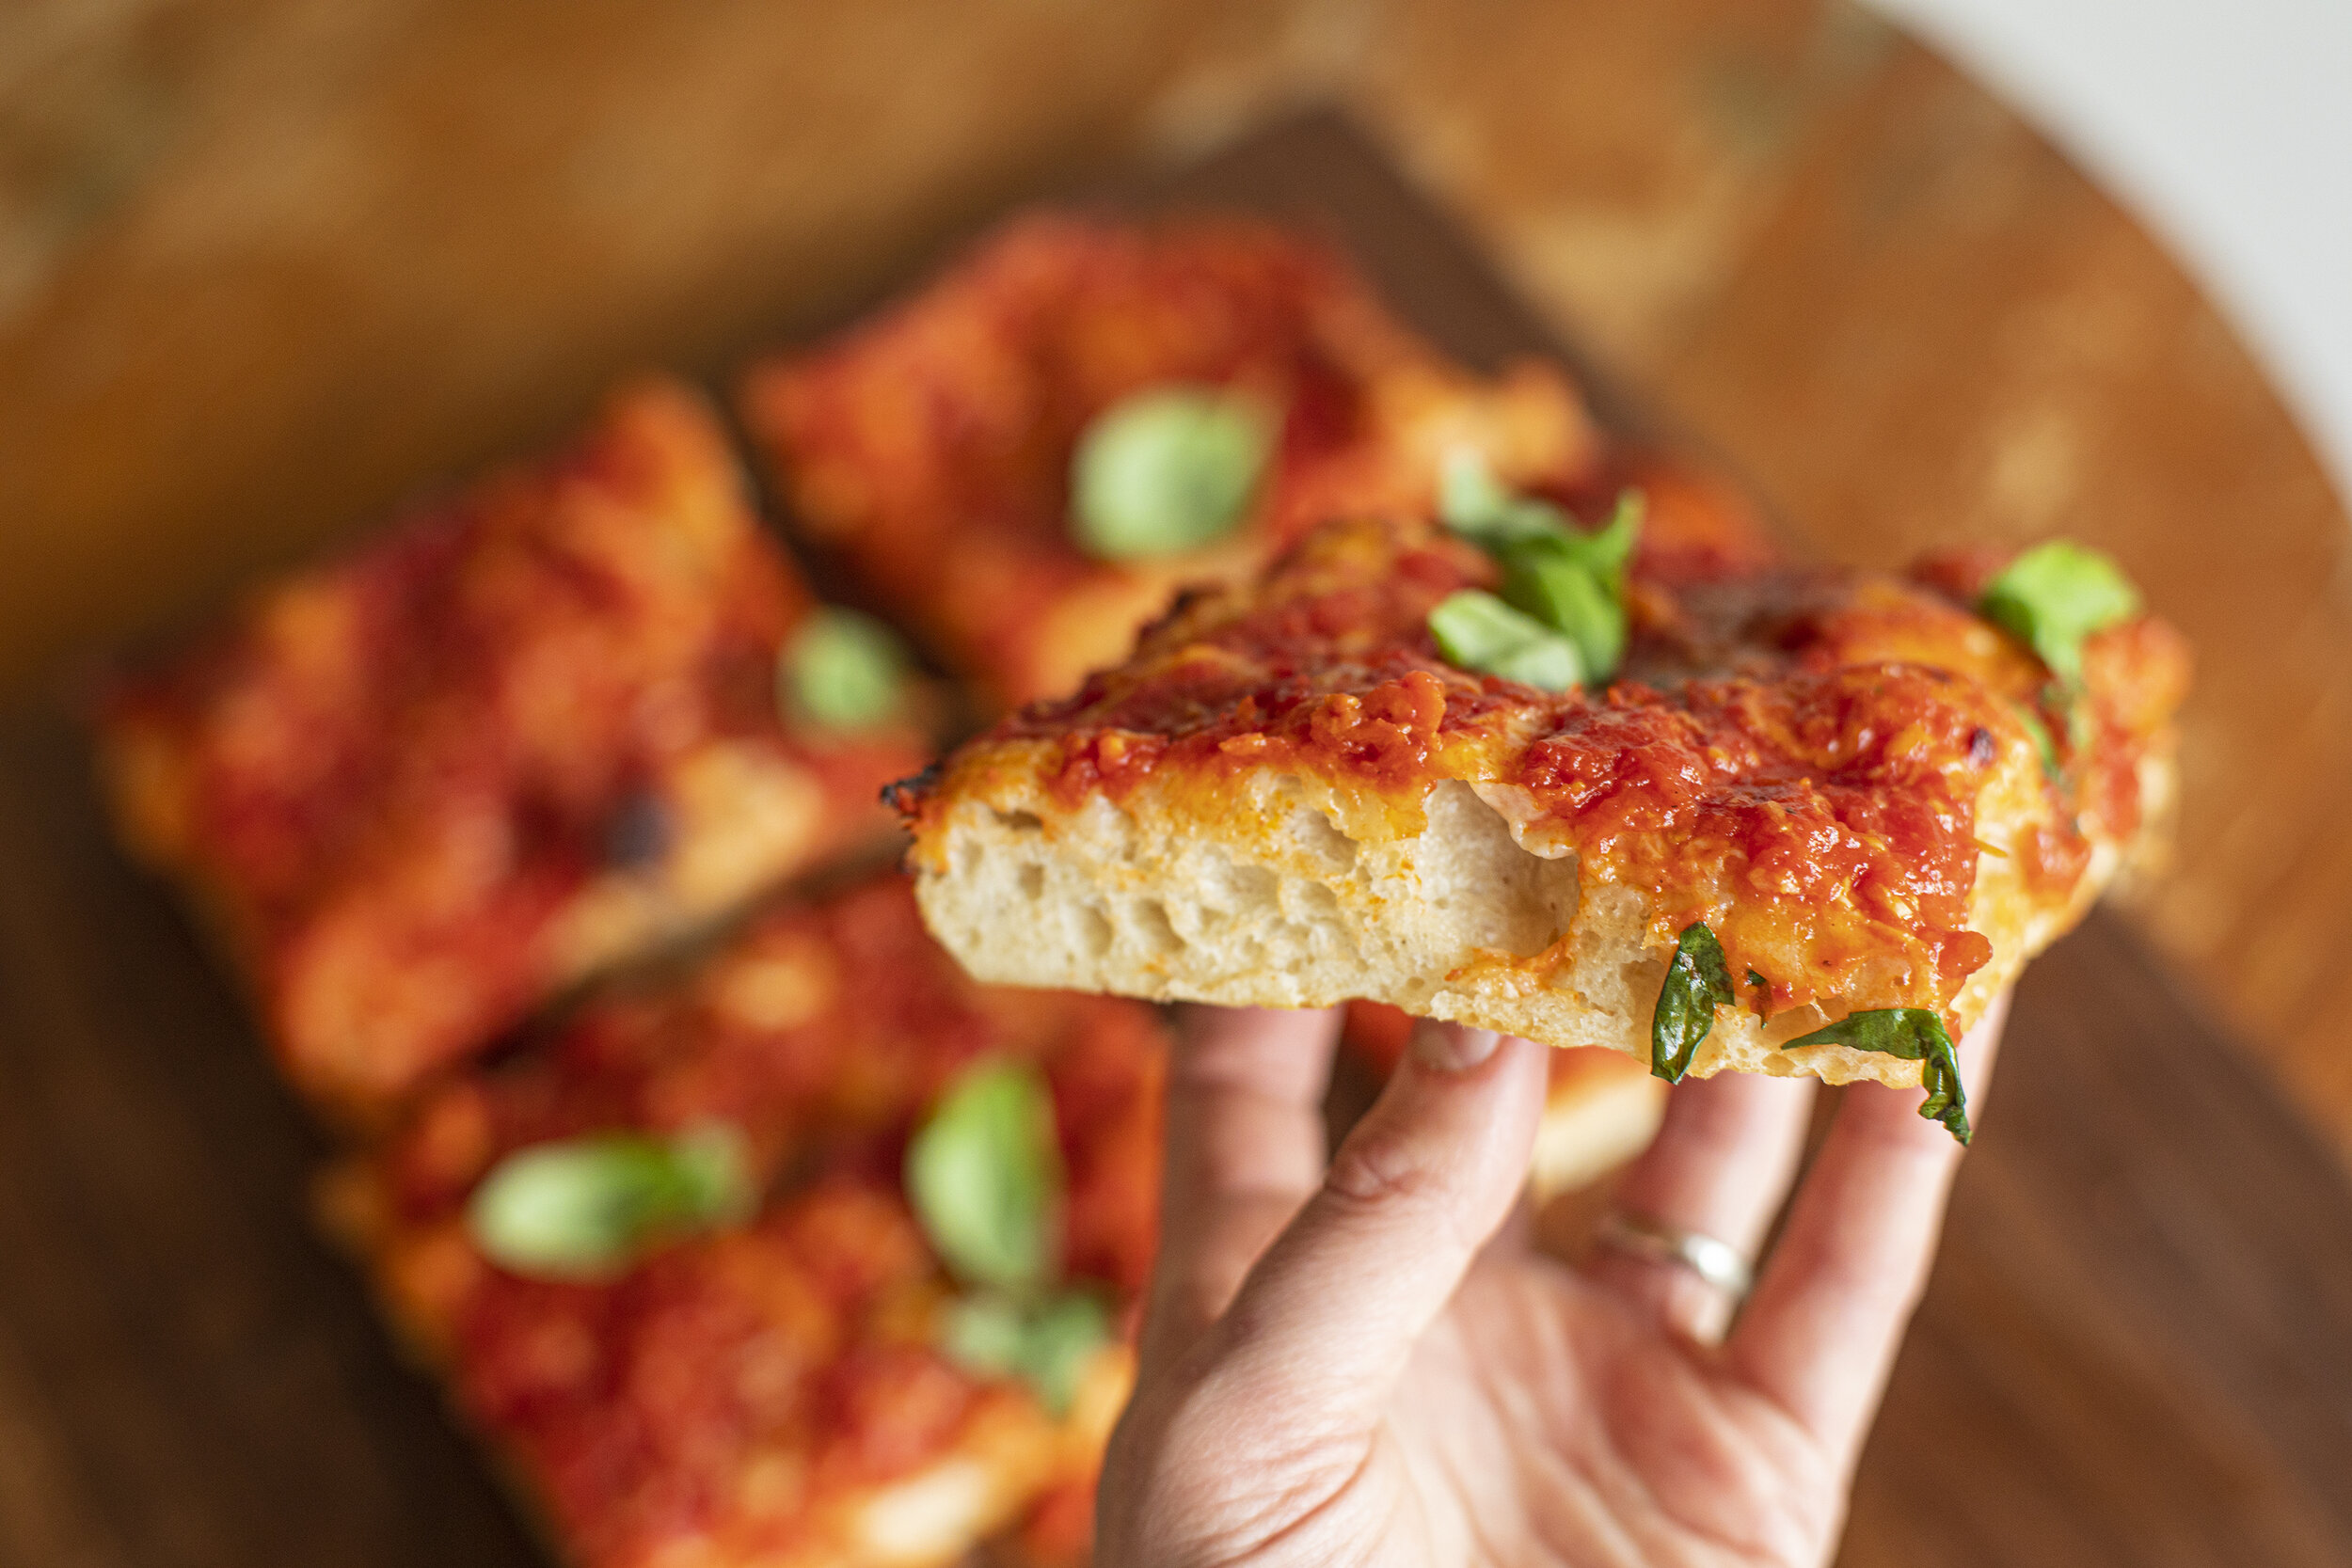
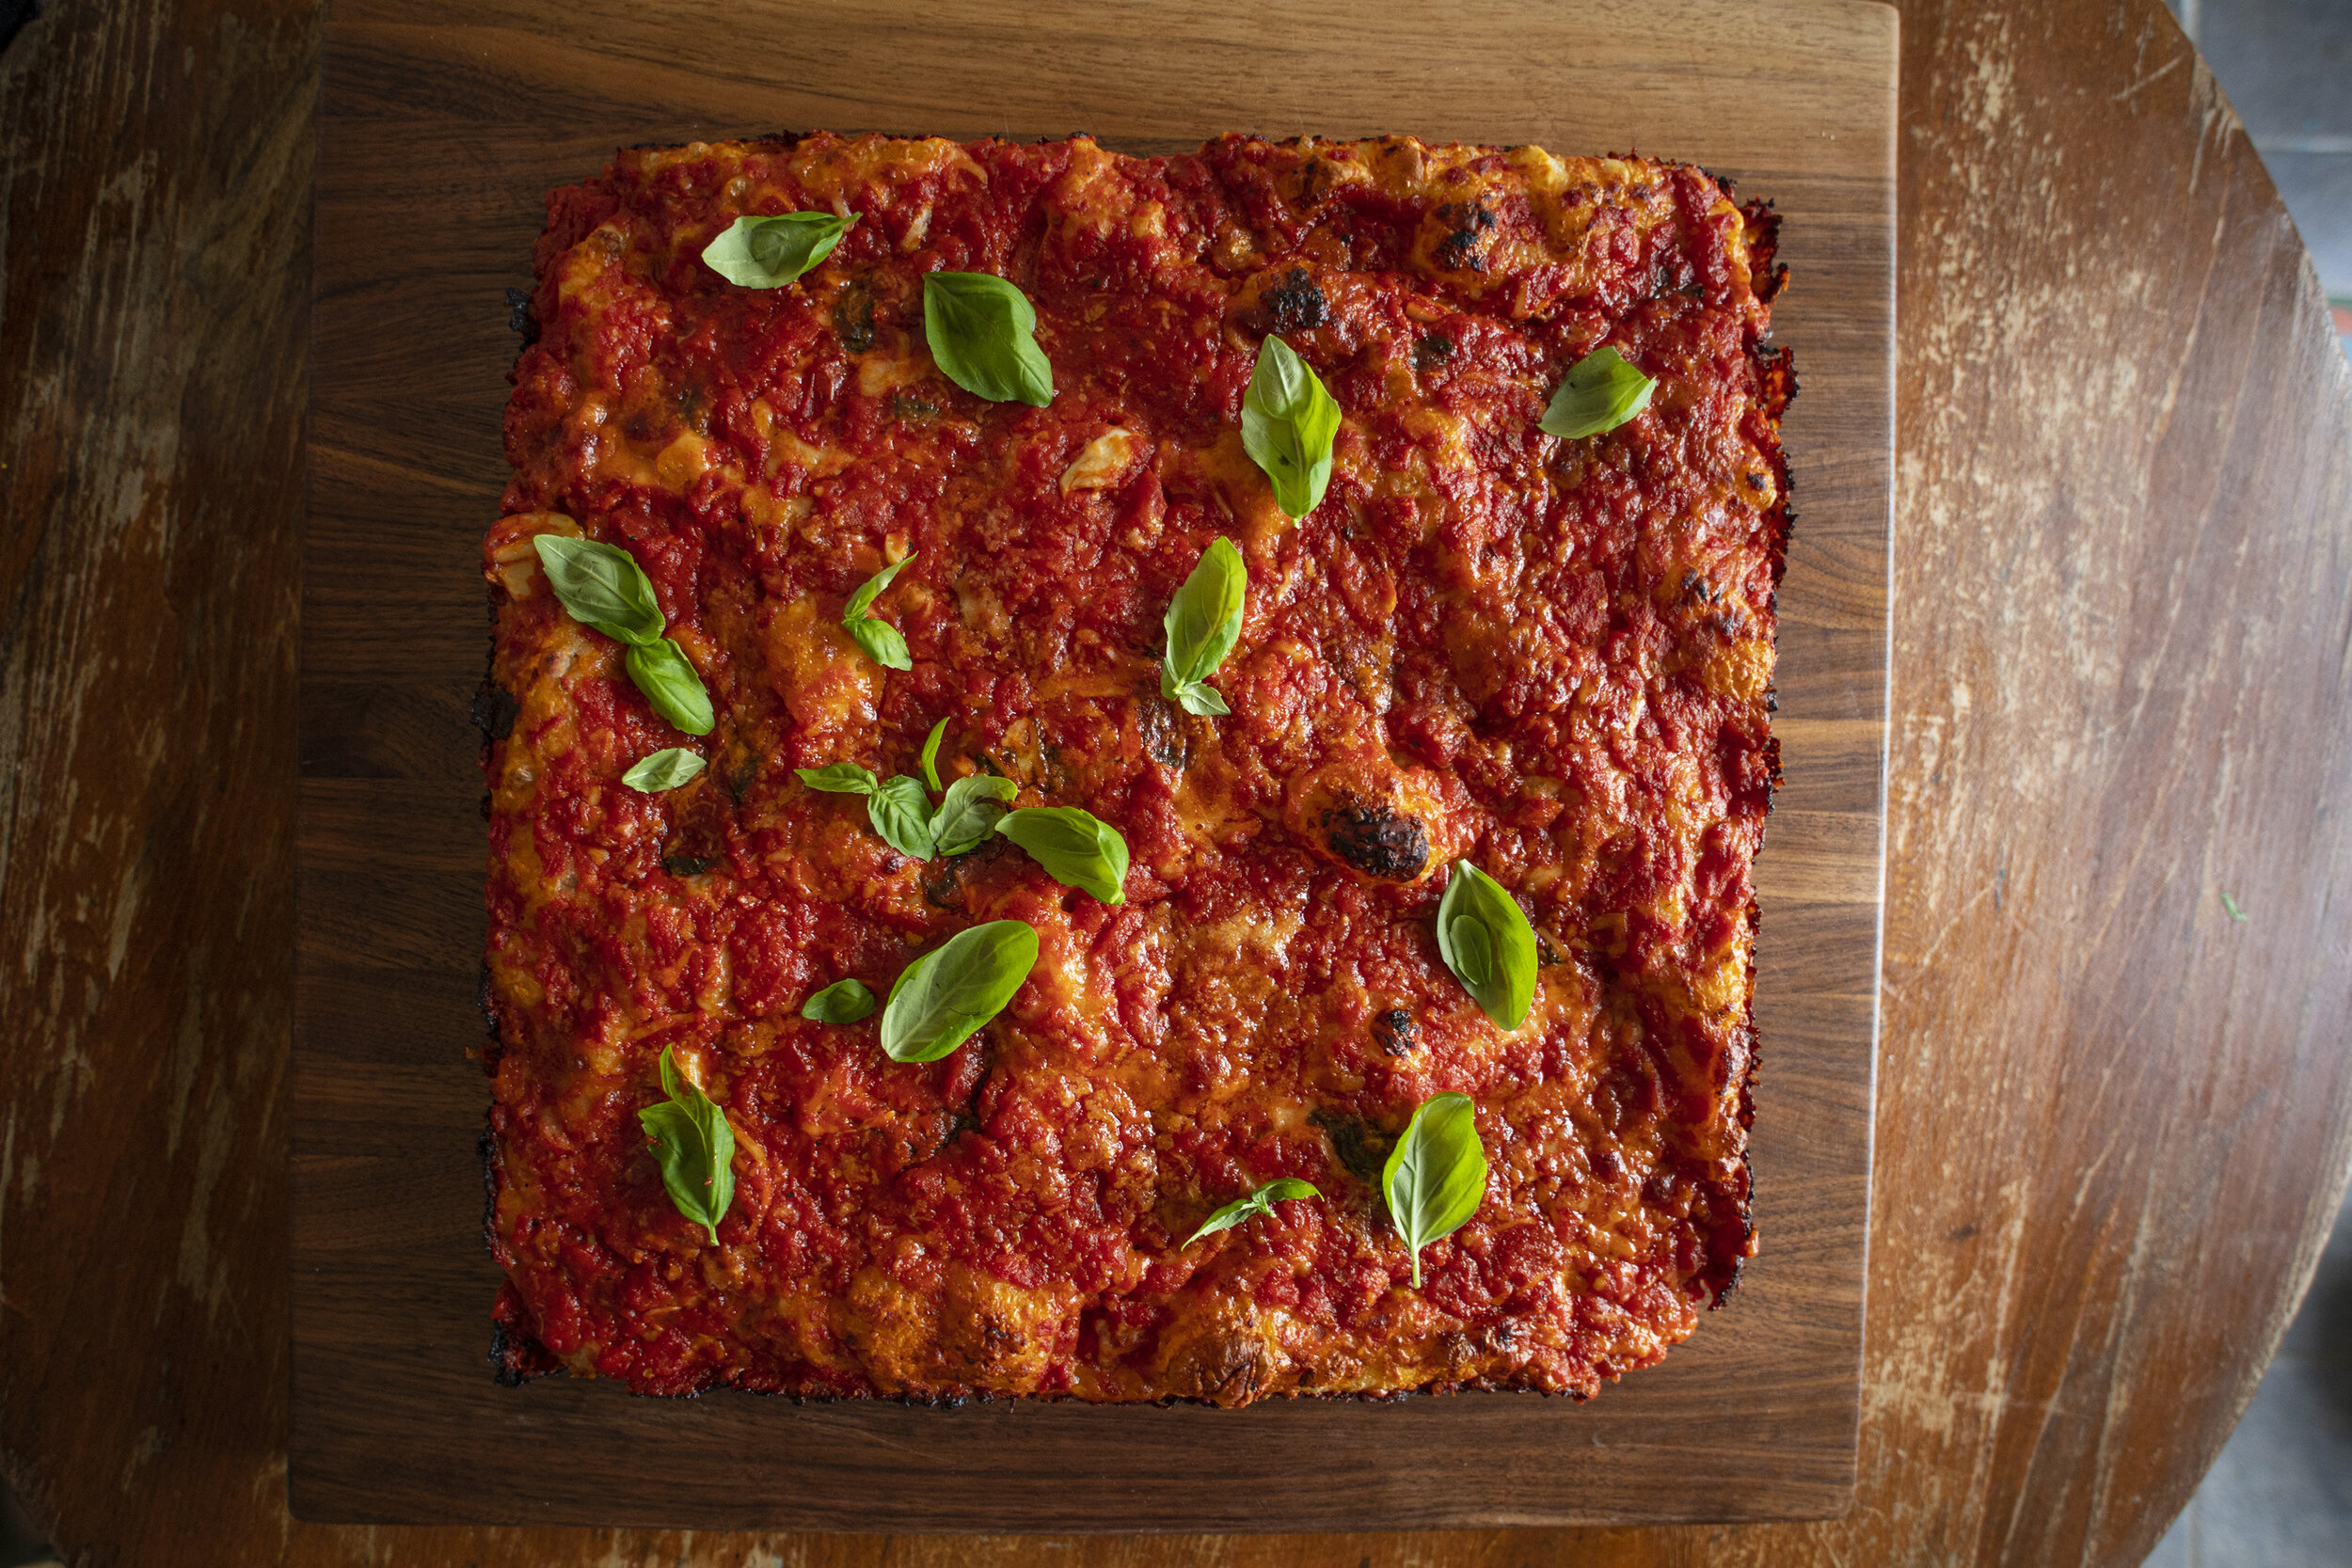
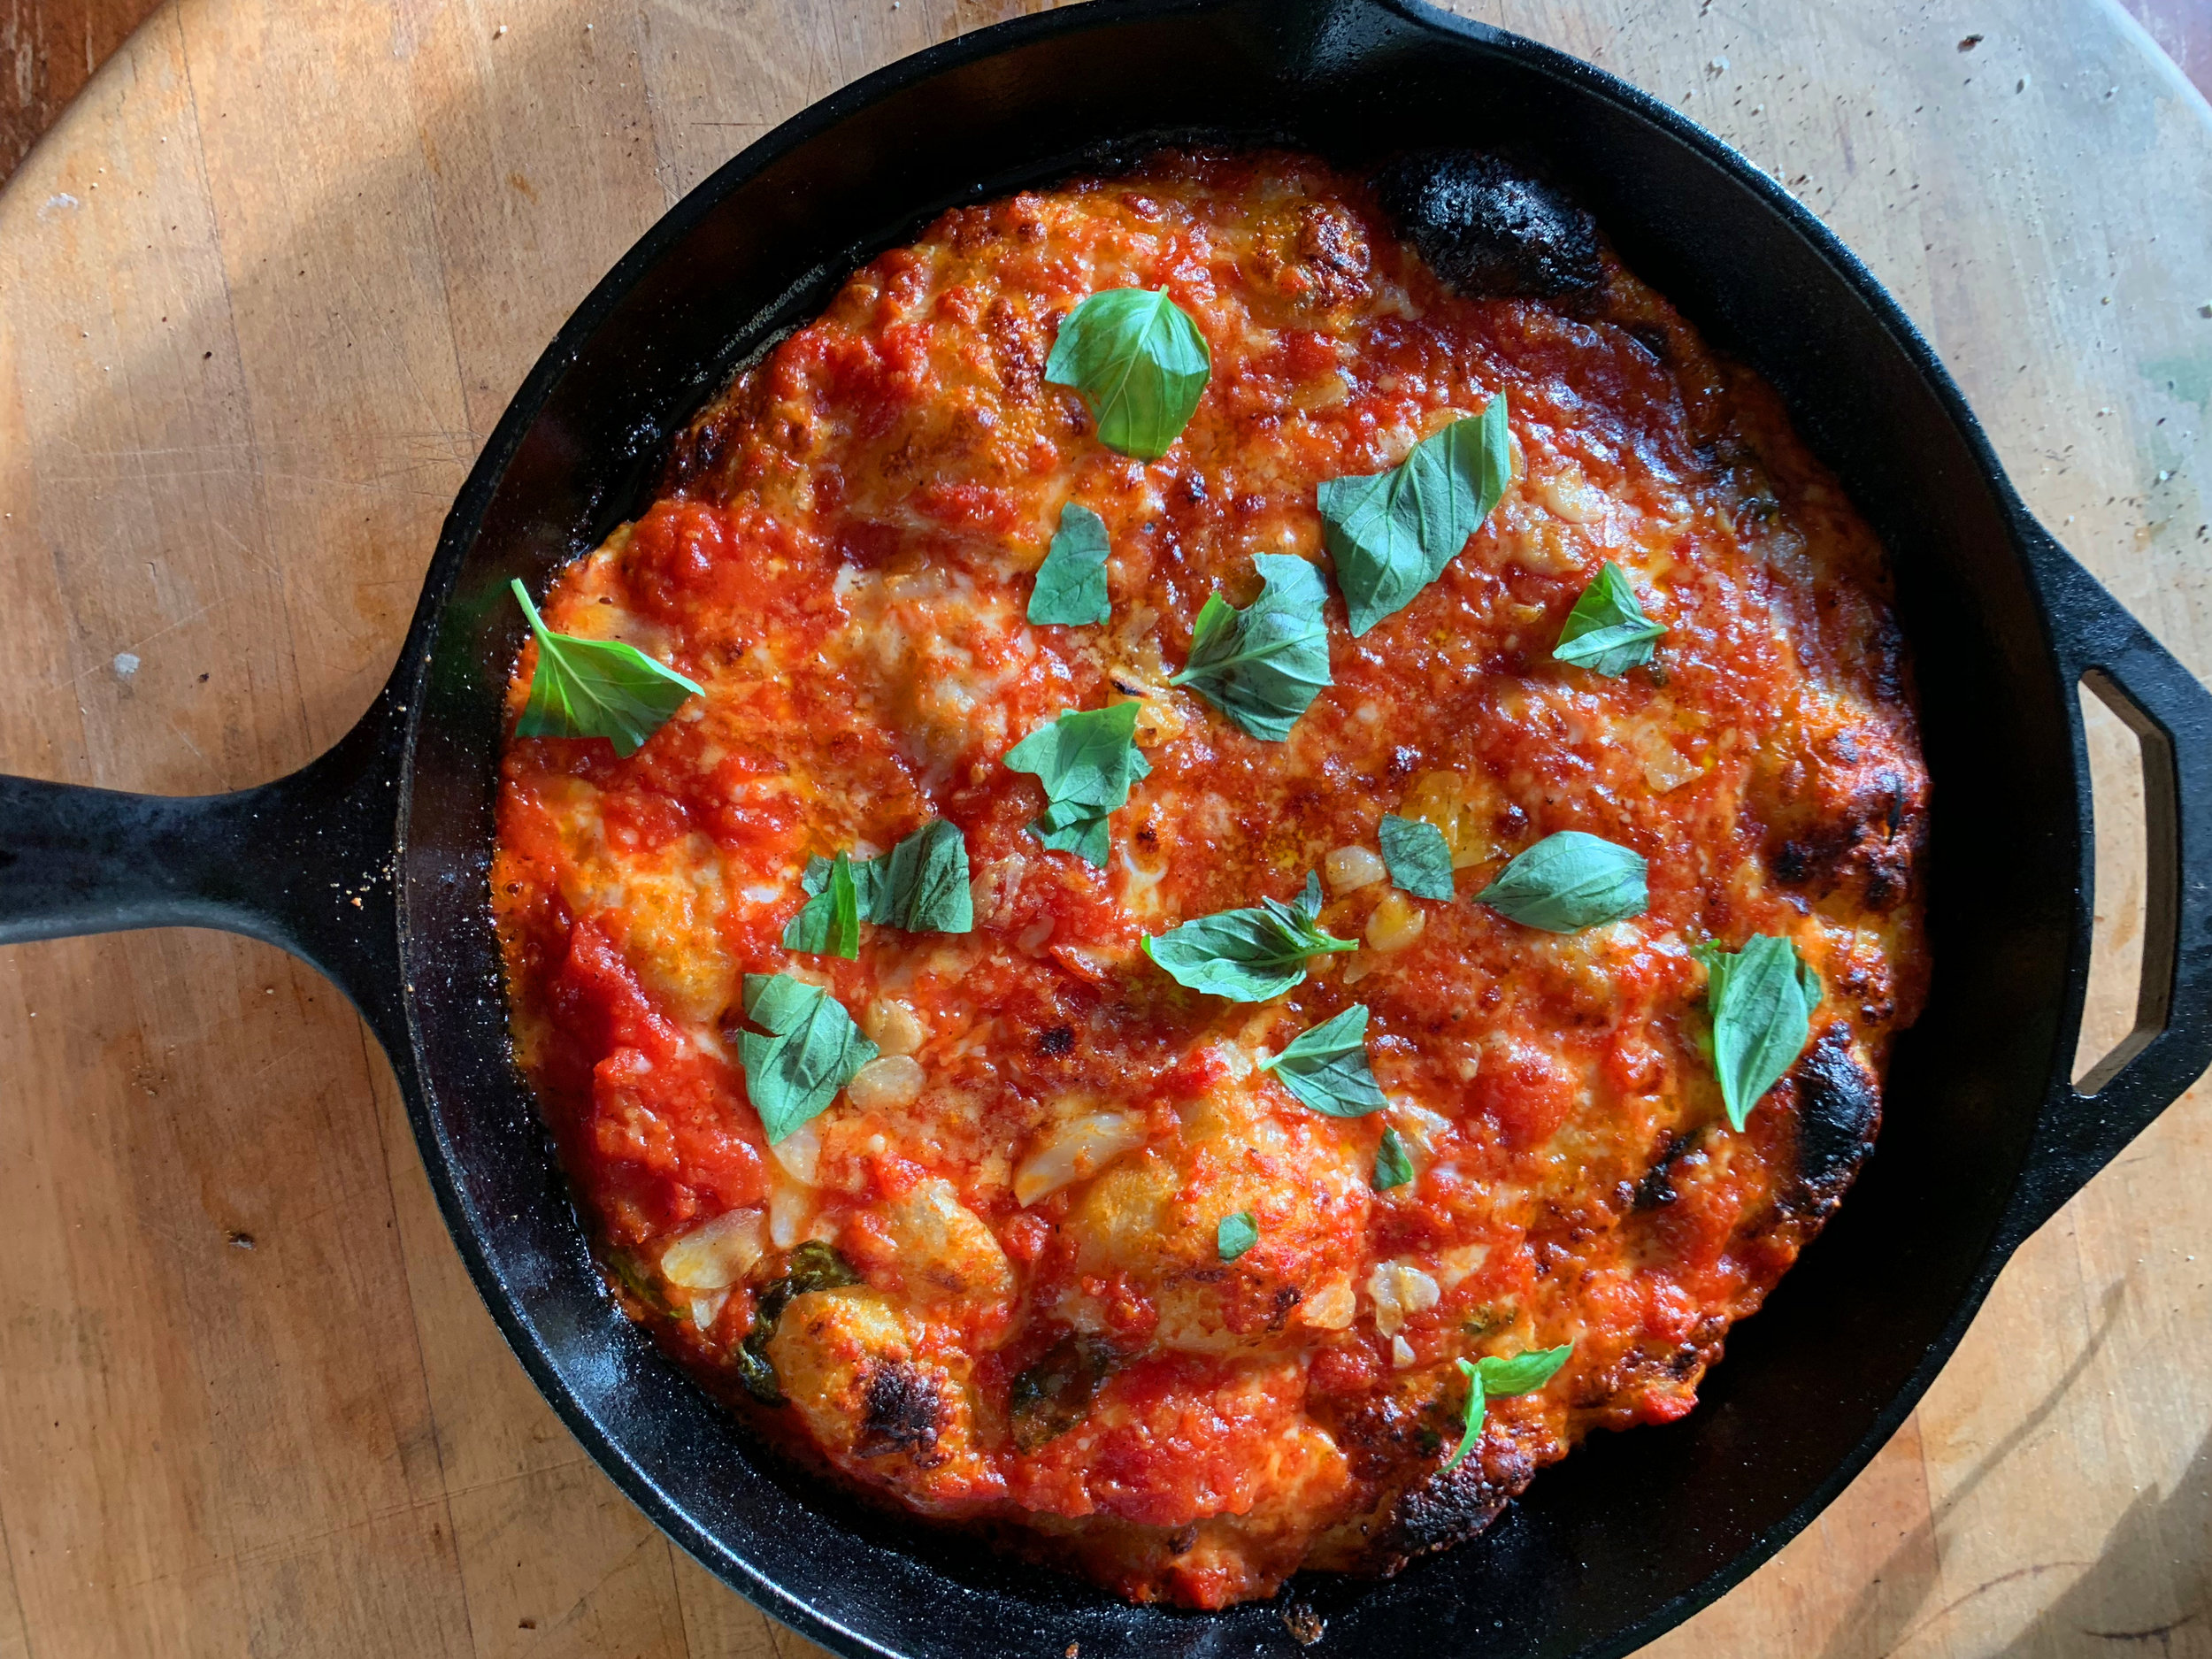
Sfincione 2.0

An updated sfincione recipe with a few small tweaks. I find this version to be superior than it’s predecessor in a few key ways. The onions are finely diced (after sauteing) so they melt in your mouth. I add more sauce in this version giving it a sweeter, saucier bite. And I’ve added two layers of grated cheese which melds it all together.

sfincione v2 3.jpg
sfincione v2 2.jpg
sfincione v2 1.jpg

Ingredients:

2 large onions 

1 x 16 oz can of high quality tomatoes - crushed

Grated pecorino or caciocavallo

Anchovy fillets mashed into small pieces to taste

Dried oregano to taste

High quality olive oil

Toasted breadcrumbs preferably coarse and unseasoned

Salt and pepper

Pizza dough (see recipe here)

Directions:

Oil a rectangular pizza pan liberally. Spread the dough out with your fingers so that it covers the bottom evenly. Press into the dough to ensure you’re spreading it evenly across the pan. Allow it to relax a little if it’s pulling back into the center. Cover with a cloth and allow it to rest while you prepare the other ingredients.

Finely dice 2 yellow onions. Saute onions in olive oil on medium heat until golden and soft. Allow to cool down. Now mince the onions down even further so it almost forms a paste like consistency.

Using a spoon or your fingers, sprinkle the mashed anchovies across the surface of the dough, massaging them into the dough. Drizzle some more olive oil over the surface. Sprinkle on a layer of dried oregano evenly across the surface. Add a layer of grated cheese evenly across the surface.

Ladle on the crushed tomatoes evenly across the entire surface. Be generous here.

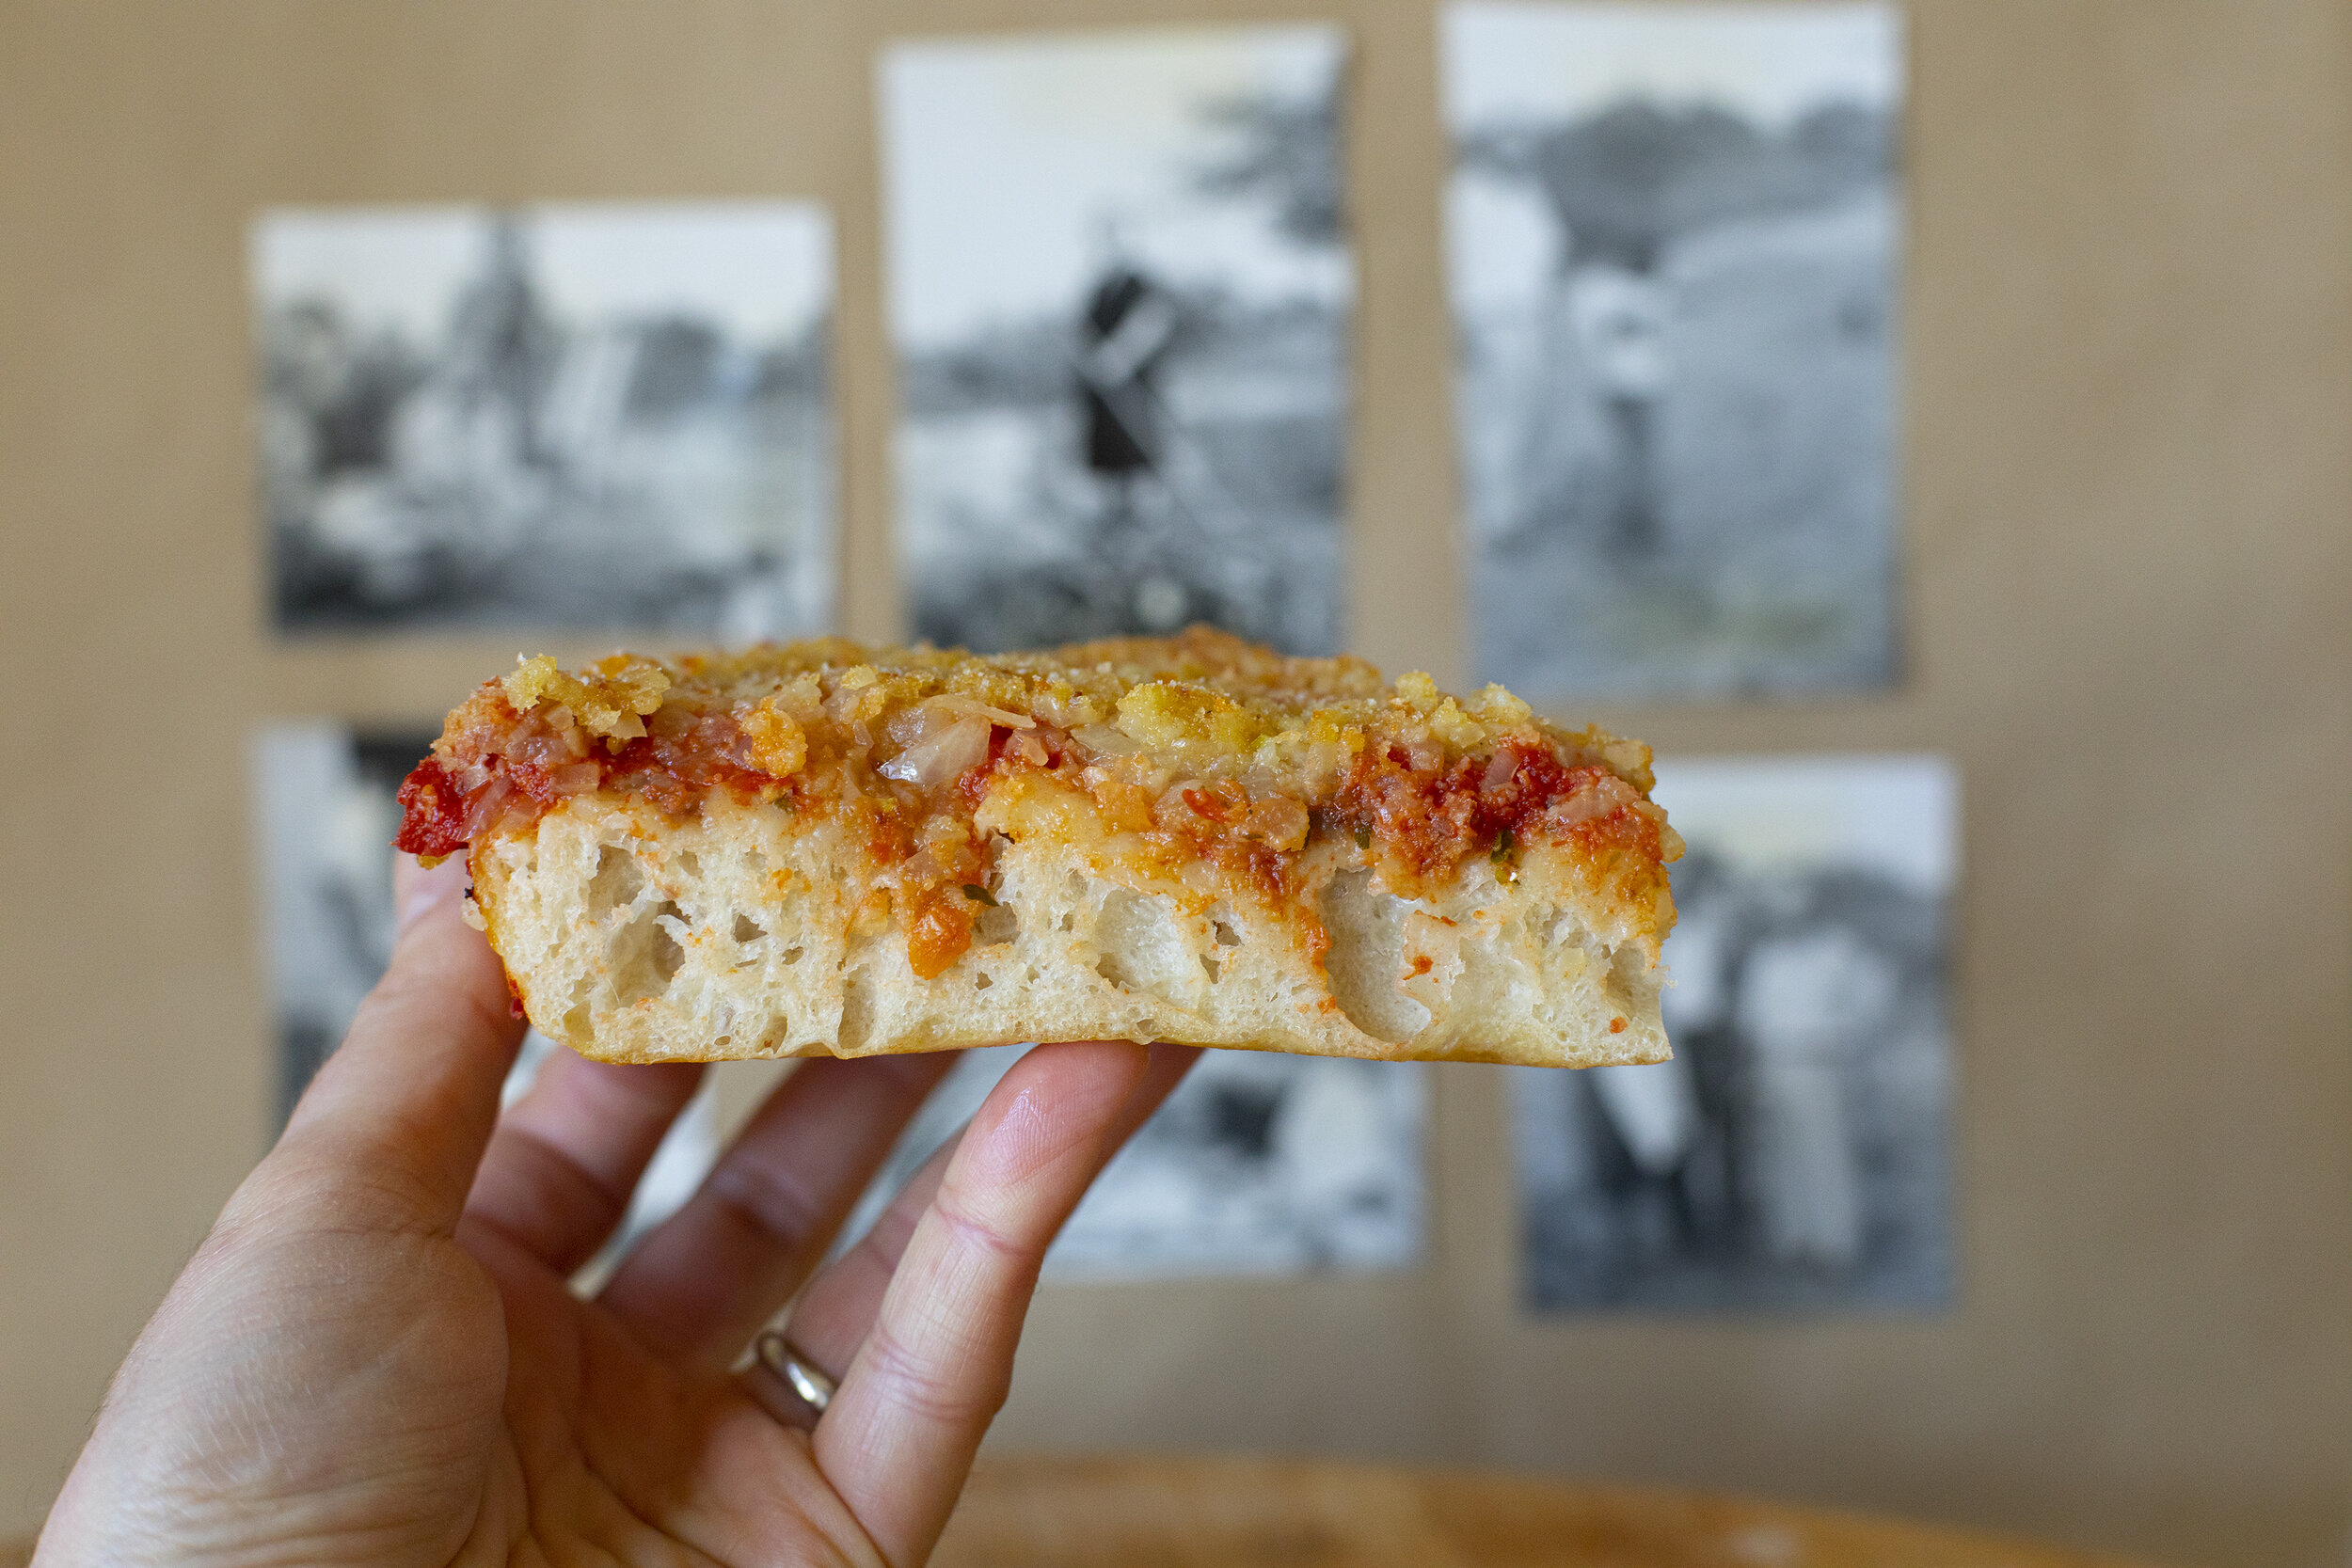
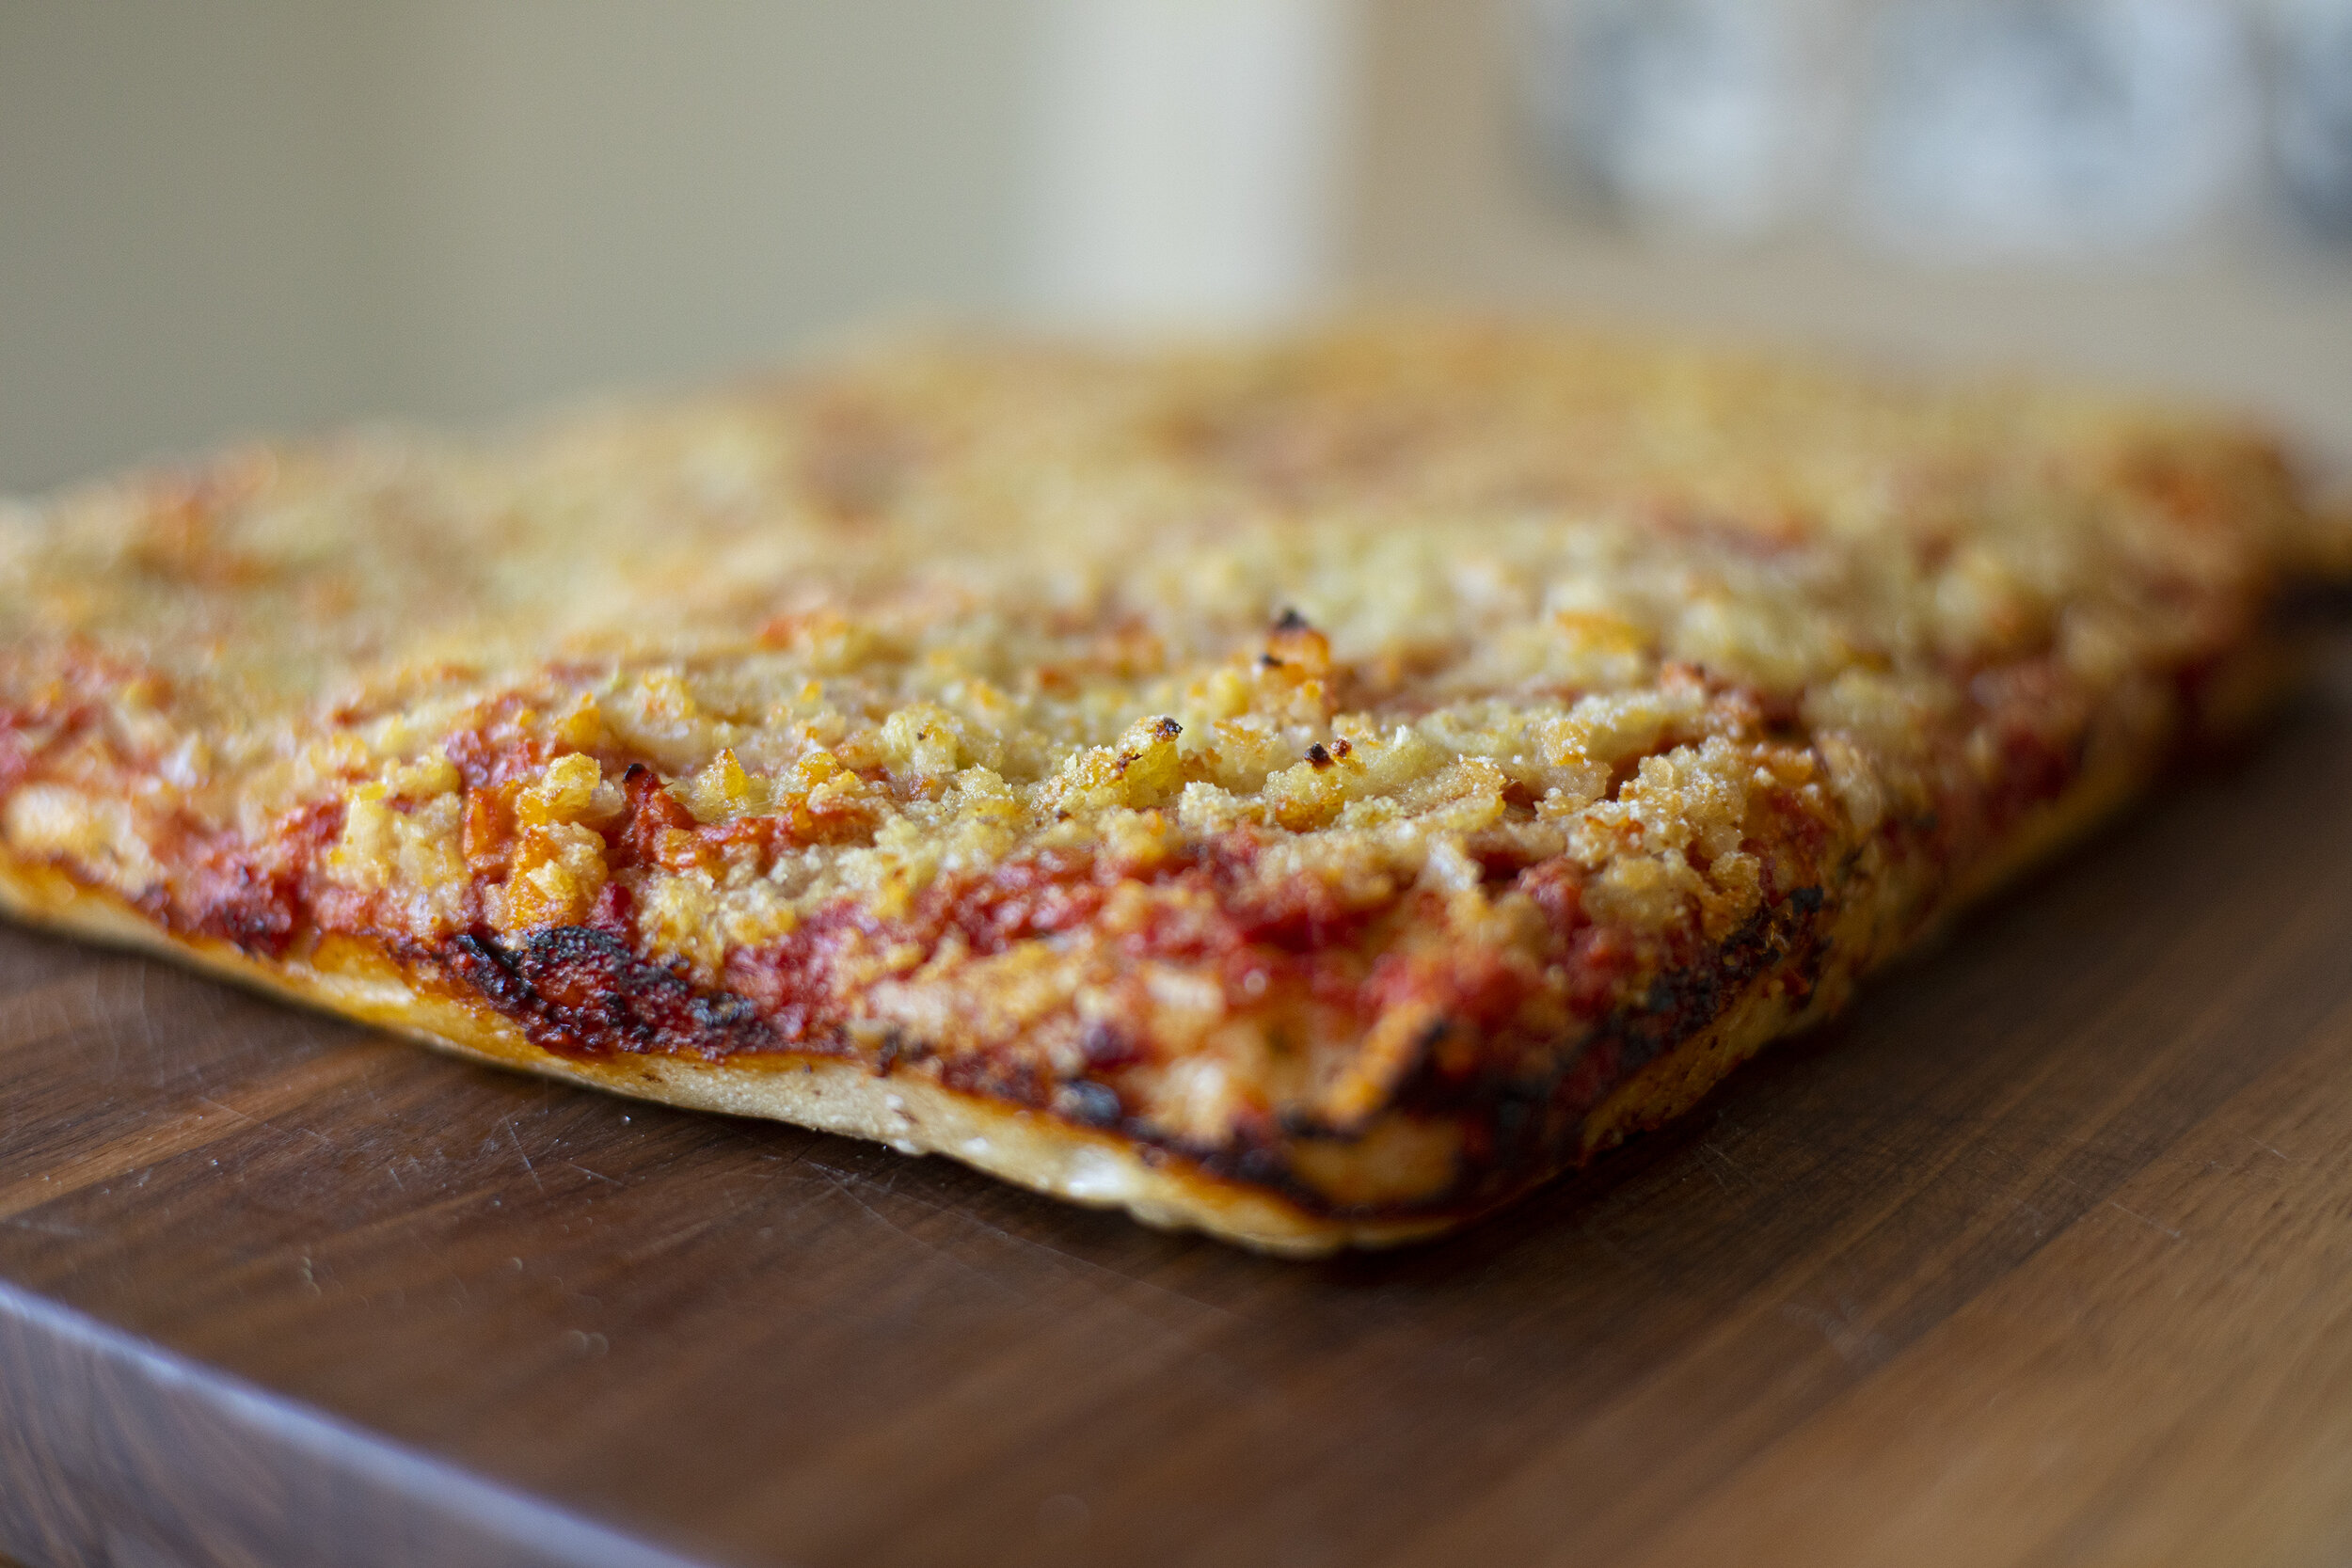
Add another layer of cheese evenly on top of the tomatoes. Spoon on the onion mixture and spread out evenly across the entire surface. Make sure it completely covers the surface.

Sprinkle on a layer of breadcrumbs, and work into the onions mixture with a spatula or your fingers. Drizzle the entire thing with some more olive oil.

Bake at 425 degrees for about 25 minutes, checking periodically. As it bakes the edges will crisp and the onions and breadcrumbs will be a beautiful golden brown. 

IMG_7753.jpeg

Summer Sun Gold Sfincione

Summer is in full effect and to celebrate the season I wanted to make this variation on the classic Sicilian sfincione. All of the essential flavors are present but modified to fit the season. Fresh oregano, the sweetest sun gold tomatoes, slivers of sauteed onions, beautiful Spanish anchovies and Sicilian olive oil from Baker Street Market , freshly grated caciocavallo, and breadcrumbs. All topped with a dollop of fresh ricotta, just because why not. Naturally leavened, using Caputo Manitoba flour. Light as a cloud and packed with incredible flavor, this will definitely be added to the rotation! Full recipe and video below.

summersfincione2.jpg

Ingredients for the pizza

1 whole yellow onion (sliced in slivers and sauteed until soft)

Sun Gold tomatoes or similar cherry tomatoes (enough to cover surface)

Bread crumbs (1/2 cup)

Anchovies (preserved in oil)

Fresh oregano

High quality olive oil

Caciocavallo cheese

Instructions for the pizza

  1. Set your oven to 425 F.

  2. Liberally oil your pan or cast iron skillet with olive oil. After your dough has come to room temperature dump it out directly into the pan and stretch and press it so it completely fills the entire area. Drizzle with more olive oil. Press into the dough to create dimples all over the surface.

  3. Layer in the anchovies. I like to use high quality Spanish anchovies and pull them apart with my fingers and distribute them evenly across the surface. Alternatively, you can mash the anchovies with a fork, and spread them around as more of a paste if you prefer. Either works well.

  4. Layer on the fresh oregano, and press into the dough with your fingers.

  5. Using a cheese grater, layer on some fresh caciocavallo cheese to cover the surface.

  6. Layer on the Sun Gold tomatoes evenly across the surface and press down so they are incorporated into the dough. Drizzle another thin coat of oil on the surface.

  7. Layer on the onions evenly across the surface but do not completely cover the tomatoes. The onions can be prepared ahead of time - sliced thinly into slivers and sauteed for about 5 - 10 minutes on medium heat. Allow the onions to cool before topping the dough.

  8. Sprinkle a layer of breadcrumbs across the top evenly.

  9. Add another layer of caciocavallo cheese to the top.

  10. Bake in the oven for 30 minutes. The top should be crispy and lightly charred.

  11. Remove from the oven and from the pan, and divide into pieces.

  12. Top each individual piece with a dollop of fresh ricotta.

  13. Enjoy.

sungolds.jpg
summersfincione7.jpg
summersfincione6.jpg

The Dough

Ingredients

Bread Flour

Active Starter

Salt

Water

This is my go-to recipe for focaccia, sfincione, and Sicilian style pizza. Keep in mind that you may need to adjust the quantity depending on your size of pan. This is designed for approximately an 11” x 14” pan.

  1. Mix together 410 g of water and 530 g of bread flour and set to autolyse for up to six hours.  Add 15 g of salt and 90 g of active sourdough starter and start working into the dough with your hands or with a rubber spatula until more or less homogenous. Let rest for 45 minutes.

  2. You’ll want to fold the dough two more times (with your hands) over the course of the next 1 - 2 hours to develop the gluten. By the end the dough should be very smooth and should not stick to your hands while folding. Cover and rest overnight at room temperature.

  3. In the morning transfer the dough to the refrigerator and take out one hour before you’ll be making your pizza.

summersfincione5.jpg
summersfincione1.jpg

Classic Sicilian Pizza

We made it through another week! We thought we deserved some deeply satisfying Sicilian pizza to celebrate. A kid hosted cooking video is below!

slice of sicilian.jpg

One of the most important parts of this pizza is the sauce. It’s simple, uses high quality ingredients, and is laden with parmesan cheese.

The Red Sauce

Ingredients

Stewed whole San Marzano tomatoes

Garlic

Yellow onion

Basil

Parmesan Rind

Salt

Pepper

Extra virgin olive oil

The key here is simplicity, and good ingredients (especially the tomatoes). Lightly puree the tomatoes in a processor or with a stick blender. Be careful not to aerate the tomatoes too much. For a chunkier sauce you can simply crush the tomatoes by hand. Set aside in a bowl. Peel and dice three to five cloves of garlic and set aside. Peel and chop the onion in half. By cooking the entire halves you will impart the flavor of the onion and the sauce won’t have chunks of onion in it. 

Heat a generous pour of EVOO in your saucepan at medium to low heat. Add your garlic and onion halves and let simmer for a few minutes. Be careful not to burn anything. Add a piece of parmesan rind into the hot oil, and let it simmer for another minute. The oils from the cheese will add depth to the sauce. Add your tomatoes to the pan, and bring to a simmer. Add salt and pepper to taste. Add some chopped basil, stir, and set on medium/low. You want your sauce to simmer for about 30 minutes. Stir frequently to make sure it's not sticking to the bottom.

The Dough

Ingredients

Bread Flour

Active Starter

Salt

Water

This is my go-to recipe for focaccia, sfincione, and Sicilian style pizza. Keep in mind that you may need to adjust the quantity depending on your size of pan. This is designed for approximately an 11” x 14” pan.

  1. Mix together 410 g of water and 530 g of bread flour and set to autolyse for up to six hours.  Add 15 g of salt and 90 g of active sourdough starter and start working into the dough with your hands or with a rubber spatula until more or less homogenous. Let rest for 45 minutes.

  2. You’ll want to fold the dough two more times (with your hands) over the course of the next 1 - 2 hours to develop the gluten. By the end the dough should be very smooth and should not stick to your hands while folding. Cover and rest overnight at room temperature.

  3. In the morning transfer the dough to the refrigerator and take out one hour before you’ll be making your pizza.

putting on sauce.jpg

The Pizza

Ingredients

Olive Oil

Red Sauce

Shredded mozzarella cheese

Grated parmesan

Basil

Instructions

  1. After the dough has come to room temperature, dump it out into a well oiled pan. Spread the dough out so it has a uniform thickness. Use the tips of your fingers to press down into dough to push it into the edges of the pan. Drizzle more olive oil on top.

  2. Cover the entire surface of the dough with shredded cheese.

  3. Ladle on the tomato sauce generously so it covers all of the cheese.

  4. Sprinkle freshly grated parmesan on top.

  5. Set oven to 425F and allow the dough to proof for another 30 mins.

  6. Bake for 30 minutes and serve.

square pizza.jpg

Tumminia Flour Sourdough Zeppole

I never dared mess with my Nonna’s zeppole (sfingi) recipe but after a few weeks of shelter in place all rules are out the window. If she were here to taste the result I think she’d approve. The addition of the sourdough yeast and the Sicilian tumminia flour give the sfingi a much more distinct flavor and spongy texture which I quite like. The shell also ends up being much crispier so there is an audible crunch upon taking your first bite. They behave a little differently in the hot oil and require some manual nudging of the dough as they cook - where as in the original recipe they did all the work themselves (flipping and turning over all on their own). I also added some vanilla while I was at it. And since I already committed my crime against tradition I made a simple chocolate sauce instead of the confectioner’s sugar. These were incredible and I look forward to making them again and again. 

The process is a bit more complicated and time consuming but it’s still a relatively approachable recipe.

sourdough zeppole 1.jpg

Ingredients

80 g tumminia flour (or regular whole wheat flour)

70 g 00 Flour 

50 g active starter

4 eggs

6 tbsp butter

Pinch of salt

½ tsp vanilla

1 cup of water

Zest or orange (optional)

For the sauce

½ cup of semi-sweet chocolate chunks

1 tbsp brown sugar

2 tbsp butter


Instructions

1. Bring water to a boil. Add butter, and a little bit of salt. Stir in the flour and mix thoroughly, and quickly. Remove from heat and let cool at room temperature. 

2. Add the starter yeast and mix together well. Cover and set in the refrigerator overnight. 

3. In the morning, take out the dough and allow to get back to room temperature so the dough begins to soften again. 

4. Add eggs one at a time, mixing very well until there are no clumps of flour. Add in lemon or orange zest. Add the vanilla. The consistency should be smooth, thicker than pancake batter, but thinner than a bread dough. Let rest for a few more minutes. 

5. Bring canola or peanut oil in a dutch oven or deep fryer to 350 F. 

6. Using a spoon, drop globs of batter into the hot oil. This recipe will require a little extra attention than the traditional non-sourdough recipe. You’ll need to manually flip them once they are fully cooked on one side. Once fully browned and crispy, remove the zeppole with a slotted spoon and let rest in on a baking rack or in a bowl with paper towels to absorb the excess oil. 

7. In a small saucepan, melt together the chocolate, butter, and sugar and simmer for a few minutes - stirring well. 

5. Once the zeppole have cooled a bit, drizzle the chocolate sauce all over the top of the zeppole and enjoy.

sourdough zeppole 2.jpg

Tumminia Flour Busiate with Fire Roasted Red Sauce

I was delighted to receive a package from @gustiamo with this incredible tumminia flour from Filippo Drago's flour mill in Castelvetrano, Sicily. I've never worked with this variety before - an ancient variety of wheat native to Sicily. I was intending on making a wood fired pasta alla norma with handmade tumminia busiate, but because of the chaos at the supermarkets and the threat of coronavirus I wasn't able to source all my ingredients and instead just opted for a simpler wood fired red sauce in the @oonihq Pro. The flour has an amazing smell and flavor, and I'm looking forward to using it to make a traditional pane nero next. A compromised vision - but a pretty tasty dish none-the-less. Full video about the process below.

plate of busiate 2.jpg

The Dough

1/2 cup of Tumminia Flour (or regular whole wheat)

1/2 semolina flour

1 cup of cold water

Olive oil

Salt

The Pasta

Form a mound in the center of your work surface with your blended flour. Using your finger tips, create a well in the center like a volcano. Slowly pour in the water a little at a time and use a fork to start combining the flour with the water. Incorporate the water completely and the mixture will be somewhat crumbly. Now start working the dough together with your hands for about 5 minutes. it will start to feel smoother. Drizzle on a little bit of olive oil, a pinch of salt, and continue working the dough for another 5 minutes until it is very smooth. If the dough feels too sticky, use a little more flour to dust the surface until the dough does not stick to the work surface or your hands. Wrap the dough ball in plastic wrap and set aside for 30 minutes at room temperature.

Unwrap a corner of the dough and start pulling out one of the side to form the shape of an elongated pear. You’ll keep pulling more dough off the end while keeping the remainder wrapped in plastic so it doesn’t dry out as you work. Rip off small balls about the size of a large grape and roll them into thin “snakes” about 6 inches long with the palm of your hands. Gently dust with more flour.

There is one essential tool you’ll need for this which essentially is a thin wooden dowel which in Sicily is referred to as a busa. Any thin wood dowel safe for food should work for this. The original way to roll the pasta was with the stem of a piece of native grass grown in Sicily. The translation of stem is busa. Hence busiate.

Take the tip of the busa and lay it over one of the ends of the rolled out dough “snake” and it should be at about a 45 degree angle. Now gently roll the busa so that the dough begins to wrap around the wood. Use gentle pressure but don’t push too hard. Here is where you’ll realize that if you don’t dust the dough enough, it will start sticking to the wood, and you’ll start to get frustrated. I promise. So be calm and make sure the dough is not sticky. After the dough is coiled around fully, gently wiggle the busa so it comes loose, and slide it out of the corkscrew shape that you just created. Repeat. Repeat, until there is no dough left. This recipe makes about 4 medium sized plates of pasta.

The video is helpful to visualize how the process looks.

flour in hand.jpg
pulling dough.jpg
corkscrews.jpg

The Sauce

Stewed whole San Marzano tomatoes

Garlic

Yellow onion

Basil

Parmesan Rind

Salt

Pepper

Extra virgin olive oil

The key here is simplicity, and good ingredients (especially the tomatoes).

For this recipe I’m using my wood fired Ooni Pro, but this is wonderful done on the stove top as well. When cooking with fire, you’ll just need to be more mindful of temperature regular but it makes more a wonderful rustic and smoky sauce. Lightly puree the tomatoes in a processor or with a stick blender. Be careful not to aerate the tomatoes too much. For a chunkier sauce you can simply crush the tomatoes by hand. Set aside in a bowl. Peel and dice three to five cloves of garlic and set aside. Peel and chop the onion in half. By cooking the entire halves you will impart the flavor of the onion and the sauce won’t have chunks of onion in it. 

Heat a generous pour of EVOO in your saucepan at medium to low heat. Add your garlic and onion halves and let saute for a few minutes. Be careful not to burn anything. Add a piece of parmesan rind into the hot oil, and let it simmer for another minute. The oils from the cheese will add depth to the sauce. Add your tomatoes to the pan, and bring to a simmer. Add salt and pepper to taste. Add some chopped basil, stir, and set on medium/low. You want your sauce to simmer for about 30 minutes. Stir frequently to make sure it's not sticking to the bottom.

fire roasted sauce.jpg

Finishing

Boil the pasta for about 4 minutes. Drain and transfer to a bowl with the sauce. Use tongs to roll the pasta around so it coats all of the noodles. Plate your pasta and finish with a generous amount of freshly grated parmesan and fresh basil. Enjoy.

Sourdough Brioche Ravazzata with Venison Ragu

I was recently turned on to Ravazzata, a traditional street food found in Palermo. The experience is like what would happen if an arancino and a sloppy joe had a baby. There are both fried and baked versions but I opted to go with a baked version for my first attempt using a sourdough brioche recipe inspired by Artisan Bryan. The ragu is mostly traditional, with the exception of swapping out beef for ground venison.

open ravazzata.jpg

The filling

1 lb ground beef (or venison)

Half of a yellow onion, finely diced

3 cloves of garlic, finely minced

6 oz tomato paste

1 cup of frozen peas

Salt and pepper to taste

Cubed provolone, caciocavallo, or your cheese of choice

Saute the onions and garlic in some olive oil for a few minutes until soft. Spoon in the tomato paste and work into the mixture. Add just a little more olive oil if you find it hard to work with but it is important that the ragu stays on the drier side to make filling the ravazzata easier. After sauteing a few more minutes add in the ground meat and keep turning until it browns evenly. Add in the peas and cook for a few more minutes, turning frequently. Add salt and pepper to taste. Set aside to cool and put it into the refrigerator to firm it up before filling.

ragu.jpg

The dough

250g Bread flour

250g All purpose flour

250g active levain

115g cold water

170g unsalted butter

175g eggs (approximately 3-4 eggs)

150g sugar

15g salt

I based the recipe off of a sourdough brioche recipe from Artisan Bryan and made a few modifications to make it more savory and less aromatic. I think it will take a few more iterations to get it perfect, but I was pleased with how it turned out for a first attempt.

dough.jpg

2pm Day 1

Cube the butter. Mix all of you dry and wet ingredients into a mixer/kitchenaid. Start off on the slowest setting and gradually increase the speed. The dough is going to be really wet and sticky but try to avoid adding more flour. Mix for about 10-15 minutes to properly develop the dough. 

Transfer to a lightly oiled bowl or container and allow to rise at room temperature for about 6 hours. Transfer to the refrigerator and cold ferment overnight for about 10 hours. 

7am Day 2

Remove dough from the refrigerator and allow to soften a little for about 20 - 30 mins so it’s easier to work with. Gently flour your work surface and remove the dough from the bowl. Gently dust the top of the dough. Now divide the dough into individual bun size balls (approx 130g each). These will proof with the filling for another 4 hrs.

filling.jpg

Assembly

Using your fingertips gently press each ball down to form something that looks like a large pancake. The edges should be slightly thinner than the middle as they will be folded up over onto each other after filling. Fill each dough round with a few spoonfuls of ragu and top each with the cubed cheese. Gently bring up the edges of the dough, around the ragu, and use your fingers to seal it together. Flip the whole thing over so that the smoother bottom now becomes the top, and transfer to a parchment lined baking tray gently dusted with semolina. 

Brush each bun with an egg wash and sprinkle a generous amount of sesame seeds all over the top surface. Set aside and proof for another 4 hours at room temperature.

finished buns.jpg

Baking

Set your oven to 400F. Bake for 30-35 minutes until light to medium brown depending on your preference. Best enjoyed while still hot.

Homemade Cannoli

dusted.jpg

My first encounter with a cannoli goes back to the 1980’s when we had large (and loud) family Sunday suppers. The older generation of grandparents, great aunts and uncles that immigrated to Brooklyn were still living and cannoli were always a key part of any large family get together. Someone would always show up with a neatly packaged box from Circo’s Bakery, tightly bound with string. On more rare occasions my Nonna would make them in her small kitchen in Bushwick, assembling them on the limited space she had on her bright orange Formica countertops. 

A freshly filled cannoli is decadent in all the right ways. It’s is a sublime textural experience that I never dreamed I could create myself. The thought never even crossed my mind. There were several trips to Sicily where I’d experience some of the best cannolis I’ve ever had. And then, a few years later, as I began revisiting old family recipes and food traditions I decided it was time to give it a try. The first attempt was a disaster. The shells exploded in the hot oil and the taste wasn’t quite right. But after a lot of trial and error I arrived at a recipe that I’d be proud to share with my Nonna. 

While it’s definitely not an easy or quick thing to make - great homemade cannoli can be had if you’re patient and careful about the details. The process requires a few key tools; a hand cranked or electric pasta roller, circular punch forms, and cannoli tubes (I use aluminum ones).  Video about the process below.

draining ricotta.jpg

The Cannoli Cream

Traditional cannoli cream uses a sheep’s milk ricotta which I prefer - if I can get my hands on it. Any other high fat unpasteurized milk will work. Or if you want to cut some corners or are tight on time you can start off with any decent premade ricotta. Skip the low fat stuff, you’re making cannoli. 

3 cups of drained ricotta (I will be posting a recipe for this soon)

1.3 cups of confectioner’s sugar

1.5 tsp vanilla

Orange Zest

Using a hand or stand mixer, whip together these ingredients for a few minutes until well incorporated. Transfer from a bowl to a piping bag and keep in the refrigerator until ready to use.

cream.jpg

The Shells

This is part that can easily go wrong and where you need to have a zen mindset. This recipe makes about 45 small to medium sized shells. 

1.5 cups of all purpose Flour

.5 tsp cinnamon powder

1.5 tsp cocoa powder

2 tbsp white sugar

.5 tsp salt

3 tbsp cubed and chilled butter

2 tbsp Marsala

.5 tsp white vinegar

.25 cup of water

1 egg (for the wash)

  1. Heat a neutral, high heat oil to 350F in a deep pot or fryer.

  2. In stand mixer, combine all of the dry ingredients and mix well. Add in wet ingredients (except the egg) and continue to blend for a few minutes. Mixture will be somewhat crumbly. Remove from the bowl and pour out onto a large working surface.

  3. Knead with your hands for 5 - 10 minutes until you have a mostly smooth and homogenous ball of dough. Wrap in plastic wrap and let rest at room temperature for 1 hour. 

  4. Remove the dough from the plastic and cut into about 5 smaller pieces. Flour the dough balls gently. Pass each ball through the pasta maker, going from the widest setting down about 6 settings. Be slow and methodical, and don’t skip any steps. 

  5. Lay each sheet of dough out on your work surface and gently flour again. Using your circular punch out form, cut circles and save all of the excess dough which you’ll use for one final pass through the pasta maker. 

  6. Carefully and tightly wrap/roll each cut circle around the cannoli tube, and seal the edge with your egg wash. Be extremely careful not to let egg get all over the place. Avoid getting the egg on the cannoli tube or the dough will end up sticking to the tube while frying. Clean up any egg that gets on your work surface. 

  7. When the oil temperature has reached 350F, drop each tube into the oil and fry until golden. Using tongs, turn the cannoli in the oil so they cook evenly. This should take only about 1 minute. 

  8. Transfer to a rack lined with paper towels and carefully slide the shells off of the tubes while it’s still hot. You’ll want to use more paper towels so you don’t burn your fingers. 

  9. The tubes should be wiped down, and chilled in the refrigerator for just 1 - 2 minutes before starting the next round of shells. This avoids a lot of mess ups.

dry mix.jpg
crumble.jpg
dough ball.jpg
circles.jpg
pistachios.jpg

The finishing touches

Once the shells have completely cooled you can start filling the cannoli. This is made easier as a two person task and makes for a fun family activity, but is manageable by one person if necessary. Using the piping bag, fill each shell starting with the center and working outwards. Nothing worse than a cannoli with a big empty pocket of air in the middle. Once completely filled, you can garnish with whatever you like. Traditional toppings include candied fruit, crushed pistachio, or chocolate chips. When the cannoli are all dressed up and ready to go, you can give them all a final dusting of confectioner’s sugar. They should be eaten fresh as they start to lose their textural appeal if they sit around too long and get soggy.

dressed up.jpg
Nonno and Nonna in Brooklyn in the 1970’s.

Nonno and Nonna in Brooklyn in the 1970’s.

Porchetta sandwich with salsa verde

porchetta sandwich 1.jpg

This was my first trial of an oven roasted porchetta sandwich with salsa verde, grated caciocavallo, on a sourdough sesame roll. Local cheese from Jersey Cheese and pork sourced from NK Prime Meats. There are definitely a few tweaks to be made on future iterations but overall pretty satisfied with version 1.0.

You’ll find countless porchetta recipes that all use different cuts of pork (from pork shoulder to pork belly) but the traditional method uses a large section of pork belly with the ribs removed and the loin still attached. If you can’t find a butcher who can prepare this more specialized cut for you, a compromise would be taking a skin-on cut of pork belly and a piece of pork loin, and working backwards to recreate the original cut. In the video below, you can watch the exact process of how the meat was broken down and rolled together with a blend of aromatics.

filling aromatics.jpg

The filling:

Finely dice fennel fronds, rosemary, sage, and garlic and mix together in a medium size mixing bowl. Add dried & crushed hot chili flakes to taste. Add zest of one lemon. Add 2 teaspoons of dried fennel seed powder, salt and pepper. Add oil oil so the entire mixture comes together like a thick paste. 

belly rub.jpg

Remove the skin from the belly and set aside for later. Next cut the loin to the exact size of the belly and butterfly it open to maximize the surface area of the meat. Set the loin piece aside and spread the aromatic filling all over the surface of the pork belly, fat side down. Lay in the butterflied loin piece and generously spread more of the filling all over the meat. Carefully roll up the belly and loin and position with fat side facing up. Rub more paste all over the top before laying on the piece of skin that was previously removed. 

trussed up.jpg

Using butcher's twine, you want to carefully truss the porchetta every few inches so that the whole piece is secure during cooking. Using a sharp boning knife, make small punctures all over the surface of the skin so that the fat renders out during cooking. Wrap porchetta and refrigerate for 6 hours to overnight. Allow to sit out at room temperature before putting it into the oven to allow the meat to relax, yielding a more tender piece of meat.

Roasting:

Set porchetta into a roasting pan with rack to keep the meat elevated during cooking. Cook for 40 minutes at 475F before lowering the temperature down to 300F for another 2 - 4 hours until the internal temperature reads 155F. The skin should puff up as it cooks and result in an airy, crispy texture. If skin still feels rubbery, use the broiler (with a very careful eye not to burn it) to finish off the skin before removing from the oven. Allow the meat to rest 30 minutes before slicing. 

Salsa Verde:

Using a food processor, blend together two bunches of parsley, garlic, a few spoonfuls of capers, 3 fillets of anchovies, juice of one lemon, a few splashes of white vinegar, and a few glugs of olive oil.

porchetta sliced.jpg

Porchetta Sandwich:

Slice porchetta in thin slices and set aside some of the crispy skin. Layer meat on a freshly baked sourdough sesame roll (recipe here) and top with salsa verde and freshly grated caciocavallo cheese (or provolone).  

sourdough rolls.jpg

Detroit Style Sfincione Pizza

I’ve been in a focaccia / pan pizza kind of mood recently and decided to give a go at a hybrid of a traditional Sicilian Sfincione and a classic Detroit pizza. It’s really the best of both worlds where the salty umami punch of the sfincione meets the crispy caramelized crust of the Detroit pizza. Short video about the process below.

detroit sfincione.jpg

The dough is an adaptation of my focaccia recipe (link here) where I have increased the hydration by 2%.

before bake.jpg

Ingredients:

2 large onions 

6 drained, peeled, crushed tomatoes from can

Grated parmigiano or fresh diced caciocavallo

Anchovy fillets mashed into small pieces to taste

Dried oregano to taste

Olive oil

Toasted breadcrumbs preferably coarse

Salt and pepper

Pizza dough

Directions:

Oil a rectangular pizza pan liberally. Line the edges of the pan with shredded mozzarella and spread the dough out with your fingers so that it covers the bottom evenly. Press into the dough to ensure you’re spreading it evenly across the pan. Add more shredded mozzarella to the top side of the dough along the edges. 

Cover with a cloth and allow it to rise for about 1 hour. In the meantime finely dice 2 yellow onions. Saute onions in olive oil on medium heat until golden. Mix in half a cup of breadcrumbs and dried oregano and toss until evenly mixed through. Allow to cool. 

Using a spoon or your fingers, sprinkle the mashed anchovies across the surface of the dough. Spoon on a thin layer of the crushed tomatoes so it covers the entire surface. Using a cheese grater, add a layer of caciocavallo evenly across the entire surface of the dough. On top of the grated cheese, spoon on the sauteed onions mixture and spread out evenly across the entire surface. Using a knife, cut thin strips of caciocavallo and line the top edge of the pan, on top of the shredded mozzarella, with even more cheese. 

Cover again and allow to rise for one more hour. Bake at 425 degrees for about 30 minutes, checking periodically. As it bakes the outer edge of cheese will form a wonderful crispy crust. 

crust.jpg

Sourdough Focaccia

Mix together 410 g of water and 530 g of bread flour and set to autolyse for up to six hours.  Add 15 g of salt and 90 g of active sourdough starter and start working into the dough with your hands or with a rubber spatula until more or less homogenous. Let rest/relax for 45 minutes. You’ll want to fold the dough two more times (with your hands) over the course of the next 1 - 2 hours to develop the gluten. By the end the dough should be very smooth and should not stick to your hands while folding. Cover and rest overnight at room temperature. 

focaccia stack.jpg

In the morning transfer the dough to well oiled pan. Spread the dough out so it has a uniform thickness. Use the tips of your fingers to press down into dough to create little pockets. Drizzle more olive oil on top, sprinkle with flake salt and herbs. Let proof in the pan for another 2-3 hours.

Set oven to 450F. Bake for 20 - 25 minutes until golden brown and well risen. Remove from oven and try not to eat immediately.

focaccia dough.jpg

Shredded Short Rib Sandwich on Wood Fired Sourdough Roll

Growing up in a home of Sicilian immigrants my food experience was very much influenced by the traditions that my parents and grandparents brought with them to America. Rustic and at times unusual foods that were part of my daily life. There were also instances where the Italian and American influences came crashing together in delicious ways.

short rib sandwich.jpg

I have vivid memories of standing around the kitchen watching my Nonnas prepare red sauce and anxiously waiting for them to make me a sauce sandwich - which simply, is a big ladle full of hot sauce slathered on a piece of Wonder bread and topped off with another slice. The weight of the sauce would practically dissolve the flimsy pieces of bread but it was always one of the most satisfying bites of food that I can remember. It’s kind of the perfect representation of my entire food experience.

ribs in fire.jpg

This sandwich is my homage to them, a sauce sandwich made with a deep and decadent 5 hour meat sauce with shredded short ribs, topped with grated caciocavallo, basil, and served on a wood fired sourdough roll. This is serious business.

ribs in sauce.jpg
wood fired.jpg
crumb.jpg

Traditional Fried Cardoon

The mysterious cardoon. In the same family as thistle and artichoke, it has been cultivated in the Mediterranean for centuries. It was one of those foods that I occasionally encountered growing up but never fully understood - food from the “old world” that became uncommon as immigrants became more Americanized overtime. Video about the process below.

fried cardoon.jpg

But this was the year that I finally decided to grow some myself. When you read about how to cultivate and prepare it, you ask yourself why you’re going through the trouble. The plant is covered in sharp spines and needs to be handled with gloves. The only edible part (when mature) is the most tender part of the stalk, but only after it is peeled, blanched, and cooked. It’s a lot of work but it also posed a new challenge.

cardoon bundle.jpg

I mostly remember it being breaded and fried so I decided to keep it classic and simple with the hopes that the artichoke-like flavor carried through. I’m not sure that cardoon will be taking up valuable real estate in my plot next season but it was a worthwhile experiment this year. 

stalks.jpg

Panelle Sandwich on Rustic Wood Fired Sourdough

Panelle is one of those iconic street foods that is ubiquitous in Palermo. Chickpea flour, seasoned with salt, pepper, olive oil, and parsley. Fried quickly until crispy and served with fresh squeezed lemon, sometimes in the form of a sandwich. It’s so simple and yet feels exotic. This version was served on top of a rustic wood fired sourdough bun baked in the Ooni Pro along with charred lemon. Video about the process below.

panelle sandwich 1.jpg
charred lemon.jpg

Lemons charred right in the coals of the oven.

rustic buns.jpg

The sourdough buns were wood fired at approximately 425F for 20 minutes. Temperature regulation remains a challenge in the wood fired oven. For more consistency a traditional convection oven works great.

Grandma Style Pizza in Cast Iron Skillet

I’ve been fine tuning this wood fired cast-iron Grandma style pie and finally getting the hang of it. The line between Sicilian and Grandma style is thin, and generally defined by the thickness of the dough and how long it proofs in the pan. This version lives somewhere in the space in between, with a nice airy crumb but not overwhelmingly bready. Earlier iterations were a bit thinner, and in the future I may want to go back to a thinner crust. Video about the process below.

IMG_8951.jpg
IMG_8958.jpg
grandma in oven.jpg

Brief History of the Arancini

Arancini translates into “little oranges.” The arancini I grew up with were gigantic softball sized balls of rice and filling that could be a whole meal in themselves, although they never were. Their origin goes back to when Sicily was under Arab rule in the 10th century, and traders devised a way to transport meals consisting of rice and meat long distances on horseback. Today, they are one of the highlights of Palermo’s street food scene and not terribly difficult to make yourself. What you fill it with is up to your imagination but here we’ll do something classic.

venisonarancini1 small.jpg

INGREDIENTS

  • Starchy short white rice or risotto

  • Parmesan cheese grated

  • Butter

  • Saffron

  • Plain bread crumbs

  • 2 cups of flour

  • Canola or corn oil

  • Salt

  • Pepper

  • 1 can tomato paste (6oz)

  • Frozen peas (1 lb)

  • 2 lbs ground beef

  • 1 Yellow onion

  • Garlic (diced)

  • Sharp provolone, cubed

RECIPE

Cook rice according to directions with the addition of one stick of butter and a few pinches of saffron. Stir constantly on a low flame. Cube the provolone. Once cooked, put rice in a large aluminum tray and sprinkle with grated cheese, and add more salt and pepper if needed. Mix well. While rice is cooling you can make the filling.

For the filling, saute onion and 2-3 cloves of garlic in olive oil. Add ground beef, salt, pepper to taste. Cook thoroughly and add can of tomato paste. Mix well and add frozen peas. The mixture should be somewhat dry. Drain off any excess liquid and put in bowl to cool off.

Set your deep fryer to 350 F. Slowly mix two cups of flour with warm water to make a paste the consistency of pancake batter. This is the glue for the breadcrumb coating. Put the breadcrumbs in a tray and set aside. Now you’ll begin forming your balls. Scoop some rice in your palm and shape it like a bowl. Add a large spoonful of the filling, and 4-5 pieces of cubed provolone. Carefully work another small scoop of rice on top of filling and shape into a ball.

To apply the glue it’s best to use your hands. Take a palm full of the glue and rub it around the riceball. Roll the rice ball in the breadcrumbs and continue to press firm to form into a nice smooth compact ball. Set the rice balls in a tray as the deep fryer heats up.

Once the fryer reaches temperature it’s time to fry. Rice balls should be almost completely submerged in the hot oil. Cook until golden brown, turning once or twice to get an even color.

Transfer the cooked rice ball to a sheet of brown paper to absorb oil and let dry before serving. Enjoy biting into the crunchy exterior and sinking your teeth into their creamy center. It doesn’t get much better.

Detroit Style Pizza

After a few months of making Neapolitan style pizzas in my new wood fired oven I wanted to try something a little different. It was a little more challenging than making a quick 60 second pizza right on the stones and maintaining steady temperature over a longer period of time. Ultimately the pizza tasted really good but I definitely need to work on the temperature regulation next time around. Some areas got a little too charred.

detroit1.jpg
IMG_7134.jpg

In the process I learned a lot about the origin of Detroit pizza and how it relates to Sicilian pizza. I made a short video that dives into the history of Detroit Style and the evolution of Sicilian pizza.

Sfincione : Traditional Sicilian Pizza

When thinking about pizza and New York City I doubt many people would consider a sfincione pie, but as a child of Sicilian immigrants it was an essential part of my pizza experience. When visiting relatives in Brooklyn, we always stopped at @rosas.pizza because they made some of the best sfincione around. It wasn’t until recently that I decided to make it myself. This version is wood fired in a cast-iron skillet using a naturally leavened dough and it brings me back to those long car rides on the BQE with the smell of a warm sfincione hanging in the air.

sfincione.jpg